 Save to Pinterest
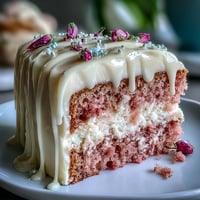
 My cousin's daughter stood at the kitchen counter in her white dress, watching me pipe buttercream onto what would become her First Communion cake. She wasn't supposed to be back there helping—her mother had shooed her away twice—but there was something about the ritual of it that made her want to be part of the process. That's when I knew this cake needed to be more than just beautiful; it had to feel like a moment we were building together, layer by tender layer.
I'll never forget how quiet the kitchen became once we placed that cross topper. The cake was finished, perfect in its delicate simplicity, and my cousin's eyes got misty. She wasn't crying about the cake itself, really—she was seeing her daughter grow up, marked by this small, sweet milestone. That's the power of a cake made with intention; it becomes a marker in time.
Ingredients
- All-purpose flour (2 ½ cups): Sift it before measuring to avoid a dense crumb; I learned this the hard way after one sunken attempt.
- Baking powder (2 ½ tsp): This is your lift; don't skip the sifting step with the flour or you'll get pockets of undissolved powder.
- Salt (½ tsp): It sounds tiny but it brightens the vanilla and keeps the cake from tasting one-note.
- Unsalted butter (1 cup for sponge, 1 ½ cups for frosting): Room temperature is non-negotiable—cold butter won't cream properly and your crumb will suffer.
- Granulated sugar (2 cups): The creaming process takes about three minutes and your arm might get tired, but this is where the cake's structure begins.
- Large eggs (4, room temperature): Cold eggs seize the batter; let them sit on the counter for thirty minutes before you start.
- Pure vanilla extract (1 tbsp for sponge, 2 tsp for frosting): Buy the real thing—imitation will taste thin and chemical against the delicate cake.
- Whole milk (1 cup, room temperature): This keeps the batter tender; I once used cold milk straight from the fridge and the texture changed noticeably.
- Powdered sugar (5 cups for frosting): Sift it or your buttercream will have tiny grits that feel wrong on your tongue.
- White fondant (16 oz): This is your canvas for those delicate roses; knead it gently until it's smooth and pliable.
- Green gel food coloring (optional): A tiny drop goes a long way with gel colors; liquid food coloring will make your fondant weep.
- Edible pearls or silver dragées (optional): These catch the light and add unexpected sparkle to your roses.
- Cross-shaped cake topper: The finishing touch that transforms a beautiful cake into something sacred.
Tired of Takeout? 🥡
Get 10 meals you can make faster than delivery arrives. Seriously.
One email. No spam. Unsubscribe anytime.
Instructions
- Prepare your pans and heat your oven:
- Grease and line two 8-inch round cake pans with parchment paper, then preheat to 350°F. This steady, moderate heat will bake your cake evenly without browning the edges too fast.
- Combine your dry ingredients:
- Whisk together flour, baking powder, and salt in a medium bowl. The whisking incorporates air and distributes the leavening evenly throughout.
- Cream butter and sugar into fluffy clouds:
- Beat softened butter and granulated sugar together for about three minutes until it's pale, light, and holds peaks when you lift the mixer. This creaming is where your cake gets its tender, delicate crumb.
- Add eggs one at a time:
- Drop each egg in individually and beat well after each addition. Rushing this step can cause the batter to look curdled, which affects your final texture.
- Mix in vanilla and begin the alternating method:
- Stir in vanilla extract, then on low speed, add the flour mixture and milk in three additions, starting and ending with flour. The alternating method keeps the batter smooth and prevents overmixing.
- Divide and level your batter:
- Pour equal amounts into each prepared pan and smooth the tops gently with an offset spatula. They'll bake more evenly if the surface is even.
- Bake until just set:
- Bake for 30 to 35 minutes until a toothpick inserted in the center comes out clean. The cakes should spring back slightly when you touch them gently.
- Cool with patience:
- Let the cakes rest in their pans for 10 minutes—this allows them to set slightly and prevents them from breaking apart. Then turn them out onto wire racks to cool completely; rushing this step is how cakes crack.
- Make your buttercream smooth and spreadable:
- Beat softened butter until creamy, then gradually add sifted powdered sugar, vanilla, and salt. Add milk or heavy cream one tablespoon at a time until you reach a spreadable consistency that holds peaks.
- Layer and crumb coat:
- Level your cake layers if they're domed, place one on your cake board, spread a generous layer of buttercream on top, and add the second layer. Coat the entire cake with a thin layer of frosting and chill for 20 minutes—this crumb coat catches loose crumbs and keeps your final frosting pristine.
- Apply your final frosting layer:
- Smooth a final, thicker layer of buttercream over the entire cake using an offset spatula dipped in warm water. Work slowly and let the warmth of the tool help you achieve that gallery-worthy finish.
- Roll and shape fondant roses:
- Roll out white fondant to 1/8-inch thickness. Roll tiny balls and flatten them into petals, then cup and overlap them to form roses—each one takes maybe a minute once your hands understand the motion. Tint a small piece green for leaves if you'd like that touch of nature against the white.
- Arrange your decorations:
- Place fondant roses and leaves on the frosted cake in a gentle pattern, adding edible pearls or dragées wherever they feel right. Step back and look at it from a distance; small adjustments now make the difference between nice and stunning.
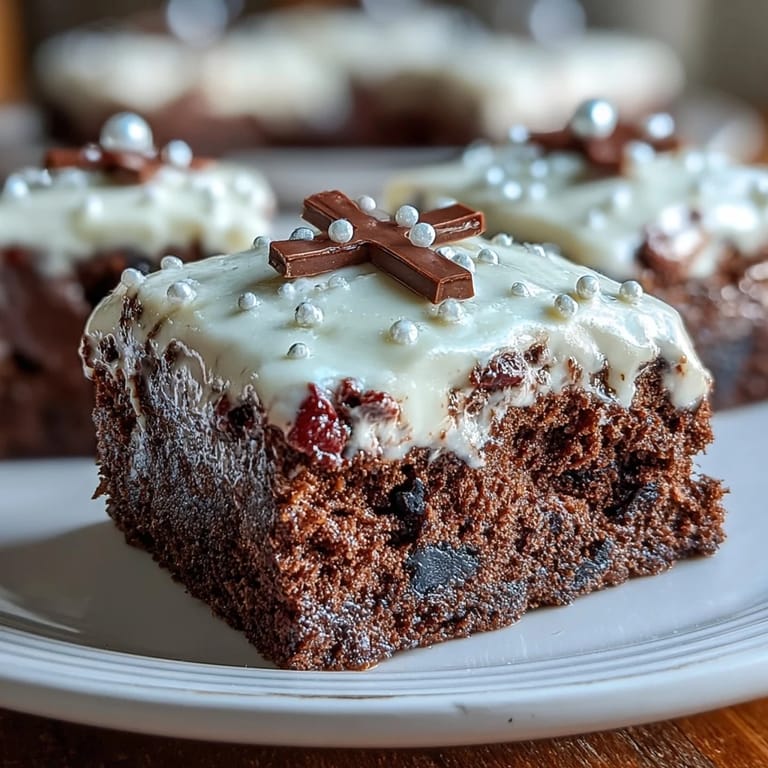
- Crown your cake with the cross:
- Position the cross topper at the center or wherever feels most meaningful to you. This small gesture completes the purpose of the cake.
- Chill before serving:
- Refrigerate the finished cake until you're ready to serve it. This sets the frosting, firms the fondant, and makes slicing cleaner.
 Save to Pinterest
 After my cousin served that cake at the reception, a little girl came up to the kitchen asking if she could watch me make one for her own communion next year. I realized then that this cake carries meaning beyond taste—it marks a passage, celebrates a milestone, and quietly tells a child that they matter enough for someone to spend two hours making something this beautiful.
The Vanilla Sponge—Why It Works
This vanilla sponge is built on a foundation of creamed butter and sugar, which creates thousands of tiny air pockets that make the cake light and delicate. The alternating method—adding flour and milk in intervals—keeps everything smooth and prevents the gluten from overdeveloping, which would make the cake tough. I've tried shortcuts with this recipe and every single time the cake suffered; this method exists because it actually works, not because it's tradition for tradition's sake.
Buttercream That Holds Its Shape
The ratio of butter to powdered sugar in this buttercream is crucial for holding decorations without tasting waxy or cloyingly sweet. The pinch of salt is a secret ingredient that brightens the vanilla and makes people unable to put their finger on why it tastes so good. When you add the milk or cream, do it slowly—this isn't the time to rush; each tablespoon changes the consistency slightly, and you want to stop just when it holds peaks but still spreads easily.
Fondant Rose Techniques and Timing
Making fondant roses feels intimidating the first time, but once your hands understand the feeling of rolling petals, you can almost do it with your eyes closed. The key is to start small—roll a pea-sized ball, flatten it paper-thin, cup it slightly, and roll the next petal around it. Some roses will be lopsided or imperfect, and that's the secret to them looking real; absolute symmetry looks artificial. Work on a surface dusted with cornstarch, not flour, and if your fondant gets warm and sticky, pop it in the refrigerator for a few minutes.
- Plan to make your roses at least a few hours before you decorate so they have time to firm up slightly and hold their shape better.
- If you're nervous about roses, you can achieve an equally elegant look with simple fondant swags or delicate lines piped with buttercream.
- Keep any fondant you're not using tightly wrapped; it dries out quickly and becomes impossible to work with.
 Save to Pinterest
 This cake is for marking something sacred in a young person's life—make it with that intention, and even if your roses aren't perfect, the cake will be exactly what it needs to be. The people eating it will taste the care in every bite.
Recipe Questions & Answers
- → How do you achieve a moist vanilla sponge?
Use room temperature eggs and milk, cream butter and sugar thoroughly, and avoid overmixing once flour is added to maintain moisture and lightness.
- → What is the best way to make smooth buttercream frosting?
Beat butter until creamy before gradually adding sifted powdered sugar, vanilla, and milk to reach a spreadable consistency without lumps.
- → How can fondant roses be shaped neatly?
Roll fondant into small balls, flatten and gently shape petals around each other, assembling layer by layer for realistic roses.
- → What is the purpose of the crumb coat on the cake?
Applying a thin layer of frosting seals in crumbs, creating a smooth base for the final buttercream layer and clean decoration.
- → Can the sponge be flavored differently?
Yes, adding lemon zest or almond extract to the batter adds extra depth and variation to the vanilla base.