 Save to Pinterest
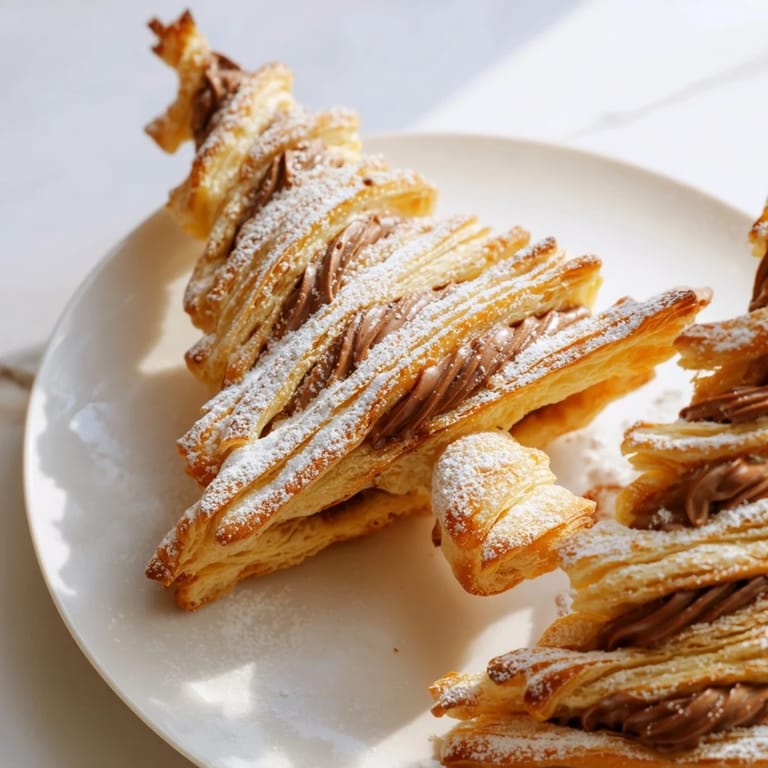
 There's something about December that makes me crave chocolate in unexpected shapes. One afternoon, while wrapping presents in the kitchen, I spotted a sheet of puff pastry in the fridge and a jar of Nutella catching the light. Within minutes, I was cutting trees from pastry and twisting branches like I was decorating an edible forest. The house filled with that buttery, toasted hazelnut smell, and suddenly I understood why these little pastries feel like Christmas on a plate.
I made these for a holiday potluck last year, and watching people's faces light up when they bit through that crackly pastry into the warm Nutella center made me realize this isn't just a recipe—it's a small moment of joy wrapped in parchment paper. One guest asked for the recipe between bites, which felt like the highest compliment possible.
Ingredients
- Puff pastry (2 sheets, about 250 g each): The foundation of everything crispy here; thaw at room temperature for 20 minutes to make cutting easier without cracking the delicate layers.
- Nutella (120 g): Spread it to the edges but stop short of the border—this prevents it from leaking out and burning on the tray while the pastry puffs.
- Egg (1, beaten): This is your golden-brown guarantee; brush it on generously for that restaurant-quality shine.
- Powdered sugar (1 tbsp, optional): A light dusting at the end mimics fresh snow and adds a subtle sweetness that cuts through the richness.
Tired of Takeout? 🥡
Get 10 meals you can make faster than delivery arrives. Seriously.
One email. No spam. Unsubscribe anytime.
Instructions
- Set the stage:
- Preheat your oven to 200°C (400°F) and line a baking tray with parchment paper. This takes exactly 2 minutes and saves you from burnt bottoms later.
- Create the chocolate layer:
- Unroll your first sheet of puff pastry onto a clean surface and spread Nutella evenly across it, leaving about a 1-cm border like a frame. Place the second pastry sheet on top and press down gently—you've just created a chocolate sandwich that's about to get very fancy.
- Shape your forest:
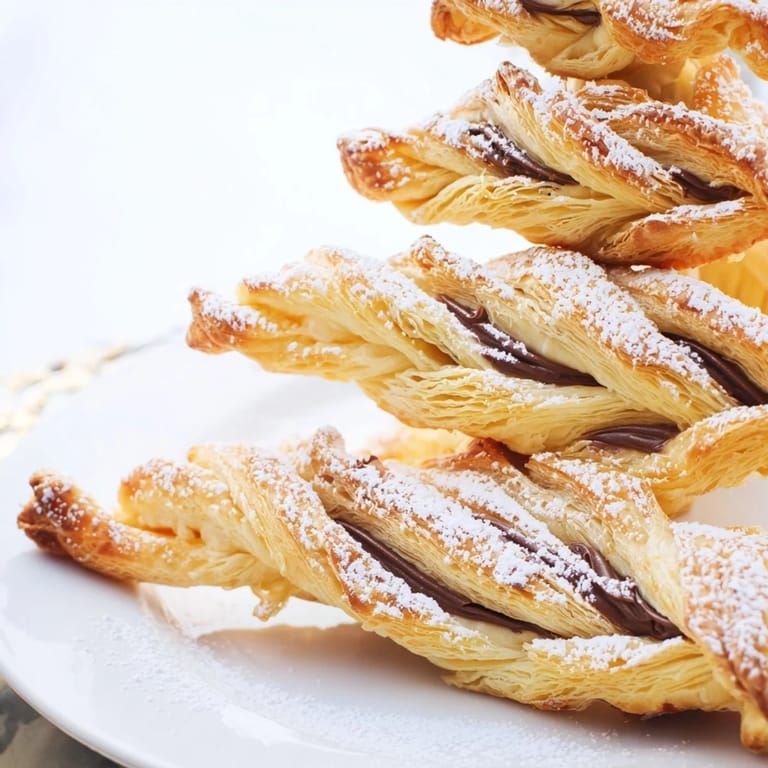
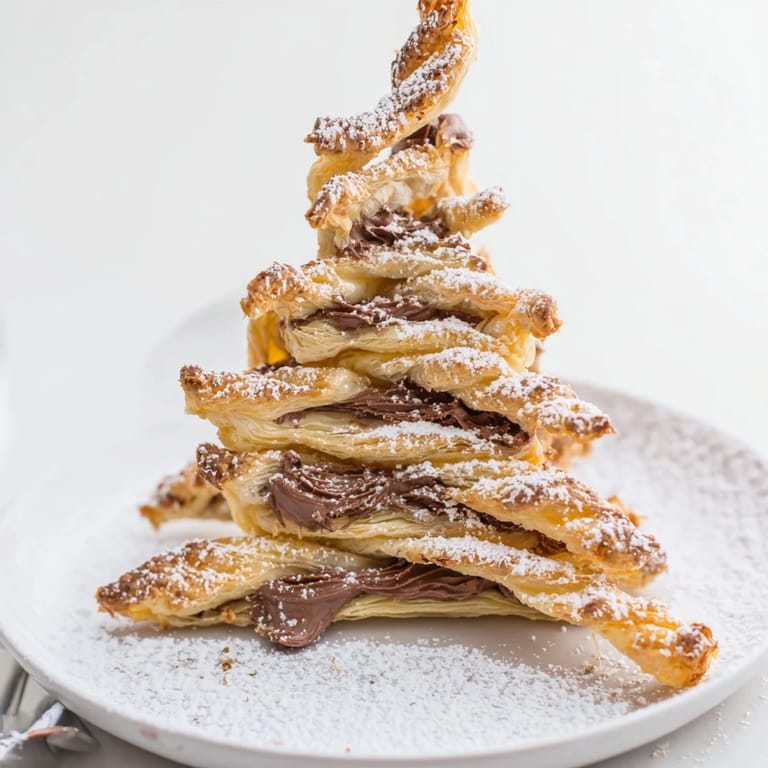
- Using a sharp knife or tree-shaped cookie cutter, cut out trees about 12–15 cm tall. Don't fret over perfection; slightly wobbly trees look more charming anyway. Save your scraps and re-roll them if you want extras.
- Add the branches:
- Lay each tree flat on your tray, then use a knife to make horizontal cuts along both sides of the trunk, going about halfway through without severing the branches. Gently twist each little branch so it curls outward—this is where they go from cute to genuinely festive.
- The golden touch:
- Brush each tree with beaten egg using a pastry brush. You're not drowning them; just a light coat that'll turn them glossy and golden in the oven.
- Bake until magic happens:
- Slide them into the oven for 16–18 minutes. You'll know they're done when they're puffed up and golden brown, and the whole kitchen smells like a Nutella factory in the best way.
- The final flourish:
- Let them cool for a few minutes, then dust lightly with powdered sugar if you like. Serve them warm or at room temperature—both are delicious, but warm is the move if you can manage it.
 Save to Pinterest
 These little trees sat on my counter cooling while holiday music played, and my daughter came in asking if they were actually edible or just decoration. When she took a bite and that caramelized Nutella met the crispy pastry, her quiet "wow" was everything. That's when food becomes memory.
Make-Ahead Magic
You can cut and shape these trees the morning before you bake them, storing them covered in the fridge until you're ready to egg wash and bake. This is genuinely useful when you're juggling holiday cooking because it means fresh pastries without the last-minute stress. I've also frozen unbaked trees for up to a week—just add a minute or two to the baking time if they're straight from the freezer.
Flavor Variations That Work
While Nutella is perfect as-is, I've experimented with swapping in other chocolate-hazelnut spreads and even tried mixing a teaspoon of instant espresso into the Nutella for a deeper flavor. One December, I sprinkled crushed hazelnuts on top before baking and got this incredible nutty crunch that elevated the whole thing. The base recipe is flexible enough to let you play without ruining it.
Serving Suggestions & Pairings
Warm hot chocolate is the obvious choice, but I've also served these alongside mulled wine for grown-up guests and with sparkling cider for a non-alcoholic version. They're small enough to be passed around at parties or stacked on a pretty plate for a cozy afternoon. The beauty is they don't need anything else—they're complete exactly as they are.
- Pair with hot chocolate, espresso, or a warming tea for that cozy factor.
- Stack them on a festive platter and let people grab what they want; they're meant to be eaten by hand.
- Make extras because they disappear faster than you'd expect, even if you think eight trees is plenty.
 Save to Pinterest
 These pastries remind me why I love cooking for holidays—it's the combination of something simple done with intention and joy. Bake them, dust them with snow-white sugar, and watch them become the small magic that makes December feel special.
Recipe Questions & Answers
- → What type of pastry works best for these trees?
Flaky puff pastry sheets are ideal as they create light, crisp layers that puff beautifully when baked.
- → Can I substitute Nutella with something else?
Yes, other chocolate-hazelnut spreads or similar creamy fillings can be used to customize flavors.
- → How do I shape the pastry trees properly?
After layering the spread, cut tree shapes and twist the branches gently to achieve a decorative, textured look.
- → Is it necessary to brush the pastries with egg wash?
Brushing with beaten egg ensures a glossy, golden finish when baked but can be omitted if desired.
- → What is the best way to serve these pastries?
Serve warm or at room temperature; they pair wonderfully with hot chocolate or mulled wine for festive gatherings.
- → Can these puff pastry trees be prepared ahead of time?
They are best freshly baked but can be reheated briefly in the oven to regain crispness if needed.